Search This Blog

TIP'S CETAGORY WITH LANGUAGE

Tips 4 pc

Update Software

Showing posts with label PhotoGraphy Tips. Show all posts

Monday, May 9, 2011

Take Great Photographs With Cameras - 7 Tips

Taking great photographs with today's automatic cameras allows anyone to produce a sharp, well-exposed image. If you are just beginning to use an 'auto-everything' camera like a 35mm compact or program SLR then your main area of control is going to be in the composition of your photographs. No one can tell you how to take a great picture because it comes down to your ability to 'see' the potential to create a picture. Never-the-less, here are 7 tips and techniques you can use to improve the final look of your photographs. You will find some of the most popular, effective and easy to implement photo techniques, that you will be able to start using right away, to improve your picture taking.

Tip 1: Read your camera manual, then read it again. Keep it with the camera and learn all of your camera's features. The more familiar you become with what your camera will do the more you will be a photographer and not just a picture taker. The more your camera automatically becomes an extension of your eyes and fingers, the more you can concentrate on your photo before you take it.

Tip 2: The Rule of Thirds. Divide the image in your viewfinder into three sections with 2 imaginary horizontal and 2 imaginary vertical lines. Place your subject near one of the intersections of those lines.
Placing your subject off-center creates an interesting, dynamic image that makes the photo more interesting.

Tip 3: Find fresh angles to take your photograph from. Change your viewpoint or the angle of view, don't be afraid to shoot from a low angle especially when photographing pets. Several years ago a single use camera manufacturer gave a camera to each of a group of younger children, the resulting pictures changed the way we look at camera angles to take photographs. When you change your camera angle be sure to get horizons horizontal. Be conscious of getting Images Straight and be sure to fill your picture frame.

Tip 4: Create active space - When photographing any object that is moving or would require space if it moved. leave space for the move. If you photographed your pet and placed the nose on the edge of the photo and left space behind, the photo would look very uncomfortable. Leave room in front and put the back close to the edge of the photo to create active space.

Tip 5: Getting backgrounds right and framing your shots. Use a dark background for taking a picture of a light object, or, alternatively, a light background for a picture of a dark object.

Caution: Absolutely light backgrounds cause flare effect that lead to reducing the overall contrast of a picture. The use of an object to frame your photo can greatly reduce this effect. For example you can use a tree limb over the top part of your photo when you take scenic photos to help improve the composition and reduce the glare.

Tip 6: Center of Interest. Try and keep only one center of interest having too many interest points in a photo is distracting causing the viewer to lose focus and interest. Use Tip 2 to place the center of interest in the proper place. When you shoot people portraits keep the subjects eyes around the top 1/3rd grid line.
Always use less distraction. Sometimes your mind tends to exaggerate what you see through the viewfinder of your camera. Very often things are perceived bigger than they actually are. What you end up with is a photograph with huge areas of wasted space around the edge and people with things growing out of their heads.

Tip 7: Editing: Before you show anyone all those holiday photos you took, edit your work. Take out all the doubles, all the duds, the ones that are out of focus and generally the ones you think are crap. Only show people the good stuff and your perception as a photographer immediately increases. Pro's often shoot a load of junk like anyone else, they just don't show it to anybody.

By: Carn Paynter

Author Bio
Carm, a retired photo lab owner, believing photography to be one of the best hobbies we can take up because it is a never ending source of pleasure in the photos we take and there is always something we can learn as long as we want to take photos. To read about hobbies and hobby ideas especially as a source of retirement activity come on over and visit www.boredbabyboomer.com

Article Source: http://www.ArticleGeek.com

Wednesday, December 8, 2010

ক্যামেরার যত্ন

ক্যামেরার যত্ন

০০ খালেদ আহমেদ ০০

আনন্দঘন মুহূর্তকে ধরে রাখতে ক্যামেরার ভূমিকা অত্যন্ত গুরুত্বপূর্ণ। ছবি তোলার জন্য আগে যেসব ক্যামেরা ব্যবহার হতো, তা এখন সময়ের বিবর্তনে হারিয়ে যাচ্ছে। ফিল্মের ব্যবহার করে অ্যানালগ ক্যামেরার দিন প্রায় শেষ। প্রযুক্তির কল্যাণে বর্তমানে ডিজিটাল ক্যামেরার জয়জয়কার সর্বত্র। সেই সাথে ডিজিটাল ক্যামেরায় আমরা পাচ্ছি বাড়তি কিছু সুবিধা। কিন্তু এসব ক্যামেরা স্পর্শকাতর হওয়ায় এর ব্যবহারে সাবধানতা অবলম্বন করতে হয়। ক্যামেরা বিশেষজ্ঞদের মতে, ক্যামেরার ব্যবহার যত বেশি, এর ক্ষতির আশংকাও তত বেশি। তবে সাবধান থাকলে ক্যামেরা নিয়ে চিন্তা করতে হবেন। আর মনে রাখতে হবে, ডিজিটাল ক্যামেরা একটু এদিক-ওদিক হলেই বিড়ম্বনা দেখা দিতে পারে। ক্যামেরার যত্ন নিয়ে আমরা কথা বলেছি কয়েকজন বিশেষজ্ঞ ও বিক্রেতাদের সাথে। তাদের পরামর্শ নিয়ে আপনাদের জন্য উপস্থাপন করা হলো ডিজিটাল ক্যামেরার যত্ন সম্পর্কে।

০০ ক্যামেরার প্রধান শত্রু হলো পানি। তাই পানির সংস্পর্শ থেকে ক্যামেরাকে দূরে রাখুন।

০০ ক্যামেরাকে সবসময় ধুলাবালিহীন ঠান্ডা স্থানে রাখতে হবে।

০০ ডিজিটাল ক্যামেরা বহনের ক্ষেত্রে উপযুক্ত ব্যাগ ব্যবহার করতে হবে।

০০ পেশাদারি কাজে ব্যবহারের জন্য দূরে বহন করতে হলে ক্যামেরার সঙ্গে নরম কাপড় পেঁচিয়ে ব্যাগে রাখতে হবে। এতে কোনো কারণে ক্যামেরায় আঘাত লাগলেও ক্ষতি থেকে রেহাই পাবে।

০০ লেন্স সব সময় নরম কাপড় দিয়ে পরিষ্কার করতে হবে।

০০ ক্যামেরার লেন্স ব্যবহারের ক্ষেত্রে এক লেন্স থেকে অন্য লেন্স বদলাতে কম সময় নিতে হবে। যাতে ধুলাবালি প্রবেশ করতে না পারে।

০০ ক্যামেরা ব্যবহারের পর ব্যাটারি খুলে রাখতে হবে।

০০ মেমোরি কার্ড থেকে যত তাড়াতাড়ি সম্ভব ছবি স্থানান্তর করতে হবে। কেননা, ভাইরাসের জন্য ছবি মুছে যেতে পারে।

০০ কম্পিউটারে ছবি নেওয়ার সময় কার্ড রিডার ব্যবহার না করে ক্যামরার সাথে থাকা ক্যাবল ব্যবহার করা উত্তম।

০০ ক্যামেরায় কোনো ত্রুটি দেখা দিলে দ্রুত সার্ভিস সেন্টারে দেখাতে হবে।

০০ ক্যামেরায় ব্যাটারি চার্জ কম দেখালে তা ব্যবহার না করা ভালো।

All Tips: Computer Tips, Internet Tips, Printing Tips, Health Tips, Life Tips, Household Tips, Career Tips, Earn By Internet, Phone Tips, Photography Tips, Fashion Tips, Hair Tips, Summer Tips, Travel Tips, Winter Tips etc.

All Blog: All Travel Way, Recipe BD, All Health BD, Dhaka All, Bangla Poetry, Bird sanctuary bd, Wallpaper All Free, Free Treatment Bd etc.

Tuesday, September 28, 2010

ডিজিটাল ছবির সঠিক প্রিন্টিং ও সংরক্ষণ প্রতি

ডিজিটাল ছবির সঠিক প্রিন্টিং ও সংরক্ষণ প্রতি

মো: মানিক মিয়া
আপনার যদি একটি ডিজিটাল ক্যামেরা, প্রিন্টার এবং পিসি থেকে থাকে, তবে আপনারা ঘরে বসেই এই কাজটি করতে পারবেন। তার জন্য প্রথমে বিভিন্ন ধরনের ফটো এডিটিং টুলস্ জাতীয় সফটওয়্যার দিয়ে ডিজিটাল ছবির কোয়ালিটি বৃদ্ধি করুন। যেমন : ছবি টিফ ফরম্যাটে সংরক্ষণ, ছবির শার্পনেস বৃদ্ধি, ছবির কন্ট্রাস্ট ঠিক করা, বিষয়বস্তু ফুটিয়ে তোলা, ছবি সঠিকভাবে ছাঁটা, ছবির গামা ঠিক করার মাধ্যমে আপনি যে কোনো ডিজিটাল ছবি সুন্দর করতে পারবেন। ছবির কোয়ালিটি বৃদ্ধির পরের ধাপগুলো এখন জেনে নিন।

প্রিন্টিংয়ে সঠিক কাগজ নির্বাচন
বাজারে প্লেইন ইঙ্কজেট, হাই রেজ্যুলেশন ইঙ্কজেট, ফটো কোয়ালিটি ইঙ্কজেট, গ্লসি এবং ম্যাট এই ক’ধরনের পেপার পাওয়া যায়। খরচ কমানোর জন্য প্লেইন ইঙ্কজেট অথবা হাই রেজ্যুলেশন ইঙ্কজেট পেপার ব্যবহার করতে পারেন। গ্লসি এবং ম্যাট পেপারে সর্বোচ্চ মানের ছবি প্রিন্ট করতে পারবেন, যা শুধু সংরক্ষণ করার মতো প্রিন্টিংয়ের ক্ষেত্রেই ব্যবহার করা উচিত।

সঠিক পিঠ নির্বাচন
যখন আপনি গ্লসি পেপার নিয়ে কাজ করবেন, তখন কোন পাশটি যে প্রিন্ট করার জন্য সঠিক তা বুঝতে হয়তো আপনার সমস্যা হতে পারে। খুব ভালোভাবে লক্ষ্য করে দেখুন, যে পিঠ প্রিন্ট করতে হবে সেই পিঠটি অপেক্ষাকৃত চকচকে হয়ে থাকে। অন্যদিকে যে পিঠ প্রিন্ট না করার জন্য, তা কিছুটা খোলা অথবা সেই পিঠে কোনো জলছাপ দেয়া থাকে। আপনি যদি আপনার প্রিন্টার কোনো শুভেচ্ছা কার্ড প্রিন্টিংয়ের জন্য ব্যবহার করেন এবং কার্ডটি প্রিন্টে করার জন্য আপনাকে উভয় পাশই প্রিন্ট করতে হয়, তবে অবশ্যই নন গ্লসি ফটো কোয়ালিটি পেপার ব্যবহার করুন।

শুকানোর জন্য সময় দিন
বেশিরভাগ ইঙ্কজেট প্রিন্টার থেকে প্রিন্ট বের হতে হতেই শুকিয়ে যায়। তবে ফটো কোয়ালিটি এবং গ্লসি পেপার সময় বেশি নেয়। বিশেষ কোনো পেপারে প্রিন্ট করা হলে তা ধরার আগ পর্যন্ত কমপক্ষে ১০ মিনিট শুকানোর সময় দিন। যখন একই সঙ্গে অনেক ছবি প্রিন্ট করবেন, সেগুলো কখনোই প্রিন্টারের ট্রে’র উপর ফেলে রাখবেন না এবং শুকানোর পর তা সূর্যের আলো থেকে দূরে রাখুন। এছাড়াও একই স্তূপে শুকানো প্রিন্টগুলো রাখার সময় দুটি প্রিন্টের মাঝখানে একটি সাদা কাগজ রাখুন। আর ফ্রেমে রাখার আগে যে কোনো ছবি ন্যূনতম ছয় ঘণ্টা শুকিয়ে নিন।

যথাযথ ছবি সংরক্ষণ করুন
প্রিন্টিংকৃত ছবি দিনে দিনে বিবর্ণ হয়ে যায় যদি তা খোলা বাতাস ও আলোর স্পর্শে থাকে। তবে কোনো প্লাস্টিক বা কাঁচের নিচে রাখলে তা বিবর্ণ হওয়া থেকে সহজেই রক্ষা করা যায়। এছাড়াও দেয়ালে ছবির ফ্রেম এমন জায়গায় স্থাপন করুন যেখানে সূর্যের আলো সরাসরি পড়ে না।
তাছাড়া আপনার অব্যবহৃত ফটো পেপারগুলো কোনো প্লাস্টিকের ব্যাগে সংরক্ষণ করুন। যে ছবিগুলো প্রিন্ট করেছেন, সেগুলোর মূল কপিও সংরক্ষণ করুন পরবর্তী সময়ে প্রয়োজনে আবার প্রিন্ট নেয়ার জন্য।

All Tips: Computer Tips, Internet Tips, Printing Tips, Health Tips, Life Tips, Household Tips, Career Tips, Earn By Internet, Phone Tips, Photography Tips, Fashion Tips, Hair Tips, Summer Tips, Travel Tips, Winter Tips etc.

All Blog: All Travel Way, Recipe BD, All Health BD, Dhaka All, Bangla Poetry, Bird sanctuary bd, Wallpaper All Free, Free Treatment Bd etc.

Tuesday, July 6, 2010

ডিজিটাল ছবি প্রিন্টিং ও সংরক্ষণ

ডিজিটাল ছবি প্রিন্টিং ও সংরক্ষণ

এম. হারুন অর রশিদ
আজকাল প্রায় প্রতিটি এলাকাতেই রয়েছে এক বা একের অধিক ডিজিটাল কালার ল্যাব অথবা স্টুডিও; যারা ছবি তোলার পাশাপাশি যে কোনো আকারের ছবি প্রিন্টও করে থাকে। তবে আপনার যদি একটি ডিজিটাল ক্যামেরা, প্রিন্টার এবং কম্পিউটার থাকে, তবে ঘরে বসেই এই কাজটি করতে পারবেন। তার জন্য প্রথমে বিভিন্ন ধরনের ফটো এডিটিং টুলস্ জাতীয় সফটওয়্যার দিয়ে ডিজিটাল ছবির কোয়ালিটি বৃদ্ধি করুন। যেমন : ছবি টিফ ফরম্যাটে সংরক্ষণ, ছবির শার্পনেস বৃদ্ধি, ছবির কন্ট্রাস্ট ঠিক করা, বিষয়বস্তু ফুটিয়ে তোলা, ছবি সঠিকভাবে ছাঁটা, ছবির গামা ঠিক করার মাধ্যমে আপনি যে কোনো ডিজিটাল ছবি সুন্দর করতে পারবেন। ছবির কোয়ালিটি বৃদ্ধির পরের ধাপগুলো এখন জেনে নিন।

প্রিন্টিংয়ে সঠিক কাগজ নির্বাচন করুন

বাজারে প্লেইন ইঙ্কজেট, হাই রেজ্যুলেশন ইঙ্কজেট, ফটো কোয়ালিটি ইঙ্কজেট, গ্লসি এবং ম্যাট এই ক’ধরনের পেপার পাওয়া যায়। খরচ কমানোর জন্য প্লেইন ইঙ্কজেট অথবা হাই রেজ্যুলেশন ইঙ্কজেট পেপার ব্যবহার করতে পারেন। গ্লসি এবং ম্যাট পেপারে সর্বোচ্চ মানের ছবি প্রিন্ট করতে পারবেন, যা শুধু সংরক্ষণ করার মতো প্রিন্টিংয়ের ক্ষেত্রেই ব্যবহার করা উচিত।

সঠিক পিঠ নির্বাচন

যখন আপনি গ্লসি পেপার নিয়ে কাজ করবেন, তখন কোন পাশটি যে প্রিন্ট করার জন্য সঠিক তা বুঝতে হয়তো আপনার সমস্যা হতে পারে। খুব ভালোভাবে লক্ষ্য করে দেখুন, যে পিঠ প্রিন্ট করতে হবে সেই পিঠটি অপেক্ষাকৃত চকচকে হয়ে থাকে। অন্যদিকে যে পিঠ প্রিন্ট না করার জন্য, তা কিছুটা ঘোলা অথবা সেই পিঠে কোনো জলছাপ দেয়া থাকে। আপনি যদি আপনার প্রিন্টার কোনো শুভেচ্ছা কার্ড প্রিন্টিংয়ের জন্য ব্যবহার করেন এবং কার্ডটি প্রিন্ট করার জন্য আপনাকে উভয় পাশই প্রিন্ট করতে হয়, তবে অবশ্যই নন গ্লসি ফটো কোয়ালিটি পেপার ব্যবহার করুন।

শুকানোর জন্য সময় দিন

বেশিরভাগ ইঙ্কজেট প্রিন্টার থেকে প্রিন্ট বের হতে হতেই শুকিয়ে যায়। তবে ফটো কোয়ালিটি এবং গ্লসি পেপার সময় বেশি নেয়। বিশেষ কোনো পেপারে প্রিন্ট করা হলে তা ধরার আগ পর্যন্ত কমপক্ষে ১০ মিনিট শুকানোর সময় দিন। যখন একই সঙ্গে অনেক ছবি প্রিন্ট করবেন, সেগুলো কখনোই প্রিন্টারের ট্রে’র উপর ফেলে রাখবেন না এবং শুকানোর পর তা সূর্যের আলো থেকে দূরে রাখুন। এছাড়াও একই স্তূপে শুকানো প্রিন্টগুলো রাখার সময় দুটি প্রিন্টের মাঝখানে একটি সাদা কাগজ রাখুন। আর ফ্রেমে রাখার আগে যে কোনো ছবি ন্যূনতম ছয় ঘণ্টা শুকিয়ে নিন।

সংরক্ষণ করুন

প্রিন্টিংকৃত ছবি দিনে দিনে বিবর্ণ হয়ে যায় যদি তা খোলা বাতাস ও আলোর স্পর্শে থাকে। তবে কোনো প্লাস্টিক বা কাঁচের নিচে রাখলে তা বিবর্ণ হওয়া থেকে সহজেই রক্ষা করা যায়। এছাড়াও দেয়ালে ছবির ফ্রেম এমন জায়গায় স্থাপন করুন যেখানে সূর্যের আলো সরাসরি পড়ে না।
তাছাড়া আপনার অব্যবহৃত ফটো পেপারগুলো কোনো প্লাস্টিকের ব্যাগে সংরক্ষণ করুন। যে ছবিগুলো প্রিন্ট করেছেন, সেগুলোর মূল কপিও সংরক্ষণ করুন পরবর্তী সময়ে প্রয়োজনে আবার প্রিন্ট নেয়ার জন্য।

Saturday, May 8, 2010

Beginning Photography Tip ( 10 Tips )

Tip #1: Move in Closer

Sailboat and Sunrise - Too Far Away
Sailboat and Sunrise
Too Far Away

Sailboat and Sunrise - Becomes Better by Moving in Closer
Sailboat and Sunrise
Becomes Better by Moving in Closer

Each time you spot a subject, snap a shot and then move in closer for a better shot. Having your subject almost fill the frame helps your viewer understand and appreciate your photo. Also, details are often more interesting than an overall view.

Keep moving in closer until you are sure the photo will successfully represent your subject.

Tip #2: Be Quick

Suzy - Taking the Picture Quickly
Suzy
For This Pic, I Had to Shoot Quickly

If it is at all possible that your subject may move, bolt, fly away, stop smiling, or just get tired of waiting for you to take the picture, shoot once right away.

Practice getting quicker and quicker to the draw.

Do not worry about taking too many pictures and do not wait until you're absolutely certain all the knobs and buttons are in their correct position.

As the motto of one of BetterPhoto old t-shirts states, "Shoot First, Ask Questions Later."

Tip #3: Compose Your Picture with Care

Touch of the Past - Balanced Composition
Touch of the Past
Balanced Composition

Even if you don't plan on selling your photo to the Smithsonian, make every effort to keep it balanced and beautiful. On one level or another, everyone responds better to a picture that has all elements in balance.

Strive to lead the eye along an interesting path through the photo, with the use of strong lines or patterns.

  • Keep the horizon level;
  • Crop out extra elements that you are not interested in (more on this is the next tip);
  • Consciously place your subject where you think it most belongs rather than just accepting it wherever it happens to land in the photo;
  • Play with perspective so that all lines show a pattern or lead the eye to your main subject;
Tip #4: Be Selective

Still Life Photography Tip #4: Focusing in on one suggestive detail
Detail Photo of French Breakfast

Discern what you are really interested in and center your efforts on getting the best photo of this subject, whether it a still life, your funny cat, your doggy, a friend, a family matter, a mood, a place or culture.

Then be sure to keep anything that would distract out of the picture. Go as far as Ansel Adams did to remove unwanted elements.

The easiest way to do this is to watch your borders - the edges of the view you see through the camera's viewfinder. Then recompose if anything - such as an unattractive telephone wire, an old soda can, a distracting sign, your finger, or your camera strap - hangs into your picture.

It can become more difficult if you want to, say, shoot a San Francisco cable car without a single distracting telephone line. But even in such a difficult case, you have many options.

You can:
  • Focus in on a close-up that tells the whole story;
  • Move around until you arrange the telephone lines into a neat pattern that leads to the subject; or
  • Take a panning shot that makes the cable car remain in focus while the background goes blurry.
Tip #5:Focus on Your Subject

Focusing on Your Subject - Heidi
Heidi
Focusing on Your Subject

Practice shooting with different apertures and monitor the results afterwards to learn how depth-of-field affects your photo.

You will find that a smaller depth-of-field (and smaller f-stop #) focuses all the attention upon your subject. This is great for taking a picture of your child, your dog, or your husband - subjects stand out against a blurry background.

Likewise, you will find that a greater depth-of-field (bigger f-stop number) will make everything from here to eternity appear in focus. This will help make those landscapes fascinating and lovely.

Tip #6:Experiment with Shutter Speed

Snoqualmie Falls - Shooting with a Slow Shutter Speed and Tripod
Snoqualmie Falls
Shooting with a Slow Shutter Speed and Tripod

One of the most basic, overlooked, and fun aspects of photography is that you have the power to slow time down or catch a split second.

One image happens so slowly that we could never see it and the other happens so quickly in real time that we would never notice it. Play with shutter speed!

Use a slow shutter speed and a tripod to make a pretty picture of any creek or stream. On the other hand, you can use a fast shutter speed (1/500 and up) to capture an object in motion.

Combining a fast shutter speed with a long lens, you sports buffs can get a trophy of your own when you are able to catch the expression on your favorite runningback's face as he slips past the final defense toward a winning touchdown. Remember, catching the moment in fast-paced action photography may take a little more practice so hang in there.

Tip #7:Look at the Light:


Look at the Light - Portrait at Sunset
Portrait at Sunset

By this, I don't mean look into the sun - no, that won't do at all. But it is good to see what kind of light you are working with. Which way are the shadows falling? Unless you want a silhouette effect, where your subject is black against an interesting background, it's generally best to shoot with the sun behind you.

How is the light affecting your subject? Is the subject squinting?

Is the light blazing directly and brightly upon your whole subject? This works well if you are in love with the bold colors of your subject.

Side lighting, on the other hand, can add drama but can also cause extreme, hard-to-print contrasts.

Lastly, indirect light can be used to make your subject glow soft and pretty.

Tip #8: Watch the Weather, Too

Look outside and decide whether or not you are going to want to have the sky in your picture.

If it's overcast, simply keep the sky out of your pictures as much as possible. This is usually the best way to avoid both muted tones in your subject and washed-out skies in your background. You might also find black and white pictures of an overcast day more pleasing than color.

When the day is beautiful, go ahead and make the most of it.

If your camera allows for the use of filters, purchase a polarizer. This will help you render deep blue skies against bright white clouds, richly contrasting colors, and other wonderful effects with a simple twist of the wrist.

Carmel Mission
Clear Blue Skies and a Polarizing Filter

Tip #9:Keep Your Camera Settings Simple

Typewriter
Typewriter
Sometimes the simplest of tools work the best

While you may wish to have "all the bells and whistles" available just in case, you will probably get the best results if you do not try to use them all the time and instead learn a simple set up that works best for you in most situations.

This doesn't necessarily mean keeping your camera set on "Program" - while this mode may be perfect in its simplicity, it may be frustrating in its tyrannical control.

Instead of relying on a fully automatic program, pick a simple, semi-automatic program such as aperture-priority and master shooting in that mode. Then, you'll be able to control certain basics without letting the other basics control you, and thus keep that 150 page manual where it belongs - in your camera bag.

Tip: if you want one accessory, bring a tripod. This one item can solve camera shake issues and help you get beautiful evening shots.

Tip #10: Be Bold

Kayak in Monterey Bay - Risky but Worth It
Kayak in Monterey Bay
Risky But Worth It

Monterey Bay - Otter Mom and Pup
Otter Mom and Pup
Awwwhhh...

Don't allow yourself to be paralyzed by fears of using the wrong settings, or an non-politically-correct social policy.

If you are afraid of upsetting someone by taking their picture, just go up and ask if it's okay. Ask them to sign a release and offer a print in return.

With wildlife, adopt a low-impact method when you go places where few photographers have gone before. For the above photos, I put my camera and telephoto in a waterproof bag and kayaked out into Monterey Bay. (Lawyer-talk: This can be dangerous - so be careful.)

Be wise... but be bold.

Wednesday, May 5, 2010

How to Shoot Landscapes in Low Light

People often believe that they can’t take good photos after the sun has gone down. However, this is not true. With the right equipment, and some patience, taking photos of landscapes at night, at dusk or at dawn can reward you with stunning pictures you didn’t believe were possible. The most important rule is to have a tripod with you to keep the camera still. Here are some tips on how to practice shooting landscapes in low light, and some ideas to try for creating some amazing effects.

Choose a location at dusk when the light in the sky is fading, where you can compose a photo with foreground, mid-ground, and background to increase the interest of the image. If you are at the beach, for example, try having a palm tree or some large rocks in the foreground, the ocean in the mid ground and the sky in the background. There is always more than one way to photograph the same scene, so try to be creative with your compositions.

2.Choose a Time
Photographs often look best when shot in low light. In the early morning and at dusk when the sun has dropped, the light in the sky becomes very soft and the colors can be warm. On a clear night with a full moon, the soft blue-ish light can have a magical affect on a landscape. If you can, you might like to try photographing the same landscape at all three times of the day.
3.Set up a Tripod

Make sure you set your camera on a sturdy tripod where it cannot slip or be knocked. You will need to shoot with long exposure times and the images will be blurry if you try to hand hold the camera. If you have a shutter release cable, use this to minimize any shake that could occur when pressing the camera’s shutter button. Take some time to adjust your composition using a wide angle lens.

4.How to set your camera

When there is not a lot of light in the sky, you will find that your ordinary camera settings will produce dark photos. The camera might also try to use the flash, however the flash is not powerful enough to light anything that is more than a few meters away.

Turn off the camera’s flash, and change the shutter speed to somewhere between 5 to 15 seconds. The longer the shutter speed, the brighter your photos will be. You can also increase the ISO to make the images brighter. Take a photo and see how it looks. Keep experimenting with different exposure times to create different effects.

5.Create amazing effects with long exposures

At the Ocean: At dawn or dusk, when there is only a little light in the sky, set up your camera and tripod where there are some waves crashing over rocks. Point the camera at the waves, but include some sky in the composition. Try setting the shutter speed to 5 seconds and take a photo. See how the ocean suddenly looks misty and mysterious.

Star Trails: Choose a clear night when the sky is very dark, and there is no moonlight. Set your digital SLR camera and tripod to point towards the sky so that there are many stars in the frame. With a cable release, leave your camera shutter open for at least 5-10 minutes. The result will be amazing streaks of color and light from the stars that trail across the photo.

City-Scapes and Traffic: A landscape can also include the city lights and traffic. Try taking a photo of a busy street at night with a shutter speed of 5 seconds while there is traffic zooming past. The headlights from the vehicles will create long patterns of light and color. Another idea is to try the same technique with fireworks. The results can be truly amazing!


~Zahid Javali

Monday, May 3, 2010

Thursday, April 22, 2010

Top 10 Tips for Great Pictures

Do you wish you were a better photographer? All it takes is a little know-how and experience. Keep reading for some important picture-taking tips. Then grab your camera and start shooting your way to great pictures.

1.

Look your subject in the eye

2.

Use a plain background

3.

Use flash outdoors

4.

Move in close

5.

Move it from the middle

6.

Lock the focus

7.

Know your flash's range

8.

Watch the light

9.

Take some vertical pictures

10.

Be a picture director

1 Look your subject in the eye:

Direct eye contact can be as engaging in a picture as it is in real life. When taking a picture of someone, hold the camera at the person's eye level to unleash the power of those magnetic gazes and mesmerizing smiles. For children, that means stooping to their level. And your subject need not always stare at the camera. All by itself that eye level angle will create a personal and inviting feeling that pulls you into the picture.

2Use a plain background:

A plain background shows off the subject you are photographing. When you look through the camera viewfinder, force yourself to study the area surrounding your subject. Make sure no poles grow from the head of your favorite niece and that no cars seem to dangle from her ears.

Improving the background is easier than you think.

3 Use flash outdoors:

Bright sun can create unattractive deep facial shadows. Eliminate the shadows by using your flash to lighten the face. When taking people pictures on sunny days, turn your flash on. You may have a choice of fill-flash mode or full-flash mode. If the person is within five feet, use the fill-flash mode; beyond five feet, the full-power mode may be required. With a digital camera, use the picture display panel to review the results.

On cloudy days, use the camera's fill-flash mode if it has one. The flash will brighten up people's faces and make them stand out. Also take a picture without the flash, because the soft light of overcast days sometimes gives quite pleasing results by itself.

4 Move in close:

If your subject is smaller than a car, take a step or two closer before taking the picture and zoom in on your subject. Your goal is to fill the picture area with the subject you are photographing. Up close you can reveal telling details, like a sprinkle of freckles or an arched eyebrow.

But don't get too close or your pictures will be blurry. The closest focusing distance for most cameras is about three feet, or about one step away from your camera. If you get closer than the closest focusing distance of your camera (see your manual to be sure), your pictures will be blurry.

5 Move it from the middle

Center-stage is a great place for a performer to be. However, the middle of your picture is not the best place for your subject. Bring your picture to life by simply moving your subject away from the middle of your picture. Start by playing tick-tack-toe with subject position. Imagine a tick-tack-toe grid in your viewfinder. Now place your important subject at one of the intersections of lines.

You'll need to lock the focus if you have an auto-focus camera because most of them focus on whatever is in the center of the viewfinder. Position the subject off-center to make a good picture great!


6 Lock the focus:

If your subject is not in the center of the picture, you need to lock the focus to create a sharp picture. Most auto-focus cameras focus on whatever is in the center of the picture. But to improve pictures, you will often want to move the subject away from the center of the picture. If you don't want a blurred picture, you'll need to first lock the focus with the subject in the middle and then recompose the picture so the subject is away from the middle.

Usually you can lock the focus in three steps. First, center the subject and press and hold the shutter button halfway down. Second, reposition your camera (while still holding the shutter button) so the subject is away from the center. And third, finish by pressing the shutter button all the way down to take the picture. Good focus lock technique takes some practice.

7 Know your flash's range:

The number one flash mistake is taking pictures beyond the flash's range. Why is this a mistake? Because pictures taken beyond the maximum flash range will be too dark. For many cameras, the maximum flash range is less than fifteen feet—about five steps away.

What is your camera's flash range? Look it up in your camera manual. Can't find it? Then don't take a chance. Position yourself so subjects are no farther than ten feet away. Film users can extend the flash range by using Kodak Max versatility or versatility plus film.


8 Watch the light:

Next to the subject, the most important part of every picture is the light. It affects the appearance of everything you photograph. On a great-grandmother, bright sunlight from the side can enhance wrinkles. But the soft light of a cloudy day can subdue those same wrinkles.

Don't like the light on your subject? Then move yourself or your subject. For landscapes, try to take pictures early or late in the day when the light is orangish and rakes across the land. You'll be amazed at how different you can make one subject look just by changing the light.

9 Take some vertical pictures:

Is your camera vertically challenged? It is if you never turn it sideways to take a vertical picture. All sorts of things look better in a vertical picture. From a lighthouse near a cliff to the Eiffel Tower to your four-year-old niece jumping in a puddle. So next time out, make a conscious effort to turn your camera sideways and take some vertical pictures.

10 Be a picture director:

Take control of your picture-taking and watch your pictures dramatically improve. Become a picture director, not just a passive picture-taker. A picture director takes charge. A picture director picks the location: "Everybody go outside to the backyard." A picture director adds props: "Girls, put on your pink sunglasses." A picture director arranges people: "Now move in close, and lean toward the camera."

Most pictures won't be that involved, but you get the idea: Take charge of your pictures and win your own best picture awards.

Wednesday, April 21, 2010

Friday, March 19, 2010

Photography tips: Digital Push Processing


The digital push is a two step process that helps to capture sharper images in low light. This technique can be used in everyday hand-held situations of low light and high zoom.

When in doubt set a higher shutter speed for safety,
and brighten the exposure later with photo editing.

The slow shutter speeds needed to make a good exposure in low light can lead to camera-shake, a common cause of a ruined photograph. You can usually save an underexposed image, but there is no cure for motion or camera blur.

Borrowing from a traditional film technique, you can "push" your digital camera by shooting for sharpness and then brightening the image later with the computer.

Step 1: Set Safe Shutter and Shoot

Step 2: Digital Push Processing


Step 1: Set Safe Shutter and Shoot:

The concept is simple: When you take the picture, make sure to lock the shutter at a *safe* speed. By over-riding the camera and manually setting the shutter, you can guarantee an image that is not affected by accidental camera-shake.


Shutter Priority Mode Method:
"Shutter Priority" is the ideal mode for a digital push. Once in this mode, set the safe shutter speed and begin shooting. Consult your camera manual for more information about how to set shutter priority mode.

Simplified Safe Shutter Speed Chart
Zoom
shakey hands
steady hands
wide angle
1/60
1/30
medium angle
1/125
1/60
zoom
1/250
1/125
high zoom
1/500
1/250

Exposure Compensation method:
If your camera does not have Shutter Priority Mode, you can use the exposure compensation feature if you have it. Normally identified by a plus/minus symbol, this feature allows you to "nudge" the camera's exposure meter.

Safe shutter speed hack:

  • Set exposure compensation to -1 stop
By making the exposure a little bit darker, the camera can use that extra freedom to set a higher shutter speed. Hopefully it will do this automatically.
Step 2: Digital Push Processing:

After shooting with the safe shutter technique, the images will usually be underexposed (but sharp!). You can then brighten and tweak the picture using photo editing software.

Adjust Levels
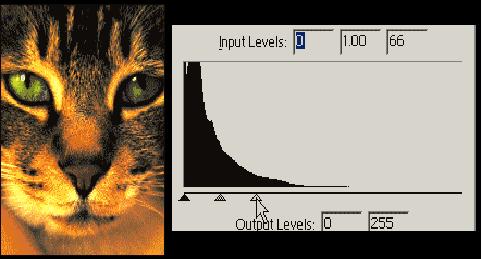
This single command will put the punch and detail back in to your (on purpose) underexposed photograph. Load the images into your favourite photo editing application, and use the Adjust Levels command to expand the detail that is compressed into the shadow areas.

Expand shadow detail - drag highlight bar to the left
The histogram display shows a graph of image detail. Most likely, you wll see most of the action towards the shadow (left) end of the scale.

To push the detail back up, you can drag the highlight slider towards the left. Preview your changes and keep going until the brightness is more to your liking.

Other Adjustments
Experiment with moving the midtone and shadow sliders, since you have your originals backed up you can always start again.

Noise and Contrast
You will notice increased contrast and noise in your digital-pushed images. This is the eternal trade-off between film sensitivity and quality:

The lower the light level,
the more noise you will get when pushing.

Remember thre are many other image processnig techniques that can help smooth and refine the image. Instead of fighting the noise and contrast, use it for effect!

Tips Of All Sorts