Search This Blog

TIP'S CETAGORY WITH LANGUAGE

Tips 4 pc

Update Software

Thursday, May 20, 2010

What is bandwidth and how much do I need for my web site?

Bandwidth is the amount of data transferred from your account at the web hosting server to visitors of your web site. It is, therefore, also known as data transfer.

You should note that visitors to your web site not only refer to fellow human web surfers but also search engine bots (programs sent out by search engines to index web sites). In fact, the data transfer by you using FTP (for web site maintenance purposes) is also counted in your bandwidth.

Web hosting companies generally mention a per day or, more commonly, a per month bandwidth in their hosting packages.

It is difficult to predict the bandwidth requirements for a web site because there are many variables involved.

  1. Number of visitors
    The more the visitors the larger the bandwidth amount required.
  2. Web page size
    A larger web page size would need more bandwidth. And by web page size, I don't mean just the size of the HTML but also the file sizes of embedded images, external javascript files, external style sheets, Flash movies, music/sound files, video etc.
  3. Large file downloads or uploads
    Obviously, web sites with small number of pages but offering downloads of very large files (such as music and video files) would have higher bandwidth requirements.

Any way, let us look at some figures to gauge the requirements of an average web site. Consider a web site with 200 web pages where each page is 100KB in size (including images and other external files). If this web site gets 400 visitors each day and each visitor views 3 pages on an average, the web site would be transferring 400 (visitors) X 3 (number of pages viewed by each) X 100KB (file size of web page) = 120,000KB or 120MB each day or 3.6GB per month.

We would all like to believe that your web sites would be the successes of the century but to dampen your "vaulting ambition", it is unlikely that a new web site would get 400 visitors, unless you start with a lot of funds for online advertising like Pay-Per-Click ads. But if you have so much moolah to begin, you would not be bothered about the amount of data transfer anyway.

Coming back to the discussion, you can only get a correct estimate of your web site bandwidth requirements once you put it online.

In any case, the data transfer offered by most web hosts would be more than sufficient for you to start operations and if your web site crosses the set data transfer limit, you can always purchase additional bandwidth.

The truth behind unlimited bandwidth

There are several web hosting companies offering unlimited bandwidth. However, there is more to it than what reaches the eye. Based on their experience, such web hosting companies know it is unlikely that web sites hosted on their servers get high levels of data transfer. Hence, they go ahead and freely advertise unlimited bandwidth. I would recommend that you read the small print and confirm this with the web host. But like I said above, the bandwidth requirements of a new site would be negligible compared to the data transfer offered by web hosts. For example, at the time of writing Lunarpages web hosting company was offering 2500GB monthly transfer.

If you want more information, you can read about unlimited bandwidth and where to get it (?) in a separate article.

Saturday, May 8, 2010

Beginning Photography Tip ( 10 Tips )

Tip #1: Move in Closer

Sailboat and Sunrise - Too Far Away
Sailboat and Sunrise
Too Far Away

Sailboat and Sunrise - Becomes Better by Moving in Closer
Sailboat and Sunrise
Becomes Better by Moving in Closer

Each time you spot a subject, snap a shot and then move in closer for a better shot. Having your subject almost fill the frame helps your viewer understand and appreciate your photo. Also, details are often more interesting than an overall view.

Keep moving in closer until you are sure the photo will successfully represent your subject.

Tip #2: Be Quick

Suzy - Taking the Picture Quickly
Suzy
For This Pic, I Had to Shoot Quickly

If it is at all possible that your subject may move, bolt, fly away, stop smiling, or just get tired of waiting for you to take the picture, shoot once right away.

Practice getting quicker and quicker to the draw.

Do not worry about taking too many pictures and do not wait until you're absolutely certain all the knobs and buttons are in their correct position.

As the motto of one of BetterPhoto old t-shirts states, "Shoot First, Ask Questions Later."

Tip #3: Compose Your Picture with Care

Touch of the Past - Balanced Composition
Touch of the Past
Balanced Composition

Even if you don't plan on selling your photo to the Smithsonian, make every effort to keep it balanced and beautiful. On one level or another, everyone responds better to a picture that has all elements in balance.

Strive to lead the eye along an interesting path through the photo, with the use of strong lines or patterns.

  • Keep the horizon level;
  • Crop out extra elements that you are not interested in (more on this is the next tip);
  • Consciously place your subject where you think it most belongs rather than just accepting it wherever it happens to land in the photo;
  • Play with perspective so that all lines show a pattern or lead the eye to your main subject;
Tip #4: Be Selective

Still Life Photography Tip #4: Focusing in on one suggestive detail
Detail Photo of French Breakfast

Discern what you are really interested in and center your efforts on getting the best photo of this subject, whether it a still life, your funny cat, your doggy, a friend, a family matter, a mood, a place or culture.

Then be sure to keep anything that would distract out of the picture. Go as far as Ansel Adams did to remove unwanted elements.

The easiest way to do this is to watch your borders - the edges of the view you see through the camera's viewfinder. Then recompose if anything - such as an unattractive telephone wire, an old soda can, a distracting sign, your finger, or your camera strap - hangs into your picture.

It can become more difficult if you want to, say, shoot a San Francisco cable car without a single distracting telephone line. But even in such a difficult case, you have many options.

You can:
  • Focus in on a close-up that tells the whole story;
  • Move around until you arrange the telephone lines into a neat pattern that leads to the subject; or
  • Take a panning shot that makes the cable car remain in focus while the background goes blurry.
Tip #5:Focus on Your Subject

Focusing on Your Subject - Heidi
Heidi
Focusing on Your Subject

Practice shooting with different apertures and monitor the results afterwards to learn how depth-of-field affects your photo.

You will find that a smaller depth-of-field (and smaller f-stop #) focuses all the attention upon your subject. This is great for taking a picture of your child, your dog, or your husband - subjects stand out against a blurry background.

Likewise, you will find that a greater depth-of-field (bigger f-stop number) will make everything from here to eternity appear in focus. This will help make those landscapes fascinating and lovely.

Tip #6:Experiment with Shutter Speed

Snoqualmie Falls - Shooting with a Slow Shutter Speed and Tripod
Snoqualmie Falls
Shooting with a Slow Shutter Speed and Tripod

One of the most basic, overlooked, and fun aspects of photography is that you have the power to slow time down or catch a split second.

One image happens so slowly that we could never see it and the other happens so quickly in real time that we would never notice it. Play with shutter speed!

Use a slow shutter speed and a tripod to make a pretty picture of any creek or stream. On the other hand, you can use a fast shutter speed (1/500 and up) to capture an object in motion.

Combining a fast shutter speed with a long lens, you sports buffs can get a trophy of your own when you are able to catch the expression on your favorite runningback's face as he slips past the final defense toward a winning touchdown. Remember, catching the moment in fast-paced action photography may take a little more practice so hang in there.

Tip #7:Look at the Light:


Look at the Light - Portrait at Sunset
Portrait at Sunset

By this, I don't mean look into the sun - no, that won't do at all. But it is good to see what kind of light you are working with. Which way are the shadows falling? Unless you want a silhouette effect, where your subject is black against an interesting background, it's generally best to shoot with the sun behind you.

How is the light affecting your subject? Is the subject squinting?

Is the light blazing directly and brightly upon your whole subject? This works well if you are in love with the bold colors of your subject.

Side lighting, on the other hand, can add drama but can also cause extreme, hard-to-print contrasts.

Lastly, indirect light can be used to make your subject glow soft and pretty.

Tip #8: Watch the Weather, Too

Look outside and decide whether or not you are going to want to have the sky in your picture.

If it's overcast, simply keep the sky out of your pictures as much as possible. This is usually the best way to avoid both muted tones in your subject and washed-out skies in your background. You might also find black and white pictures of an overcast day more pleasing than color.

When the day is beautiful, go ahead and make the most of it.

If your camera allows for the use of filters, purchase a polarizer. This will help you render deep blue skies against bright white clouds, richly contrasting colors, and other wonderful effects with a simple twist of the wrist.

Carmel Mission
Clear Blue Skies and a Polarizing Filter

Tip #9:Keep Your Camera Settings Simple
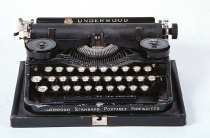
Typewriter
Typewriter
Sometimes the simplest of tools work the best

While you may wish to have "all the bells and whistles" available just in case, you will probably get the best results if you do not try to use them all the time and instead learn a simple set up that works best for you in most situations.

This doesn't necessarily mean keeping your camera set on "Program" - while this mode may be perfect in its simplicity, it may be frustrating in its tyrannical control.

Instead of relying on a fully automatic program, pick a simple, semi-automatic program such as aperture-priority and master shooting in that mode. Then, you'll be able to control certain basics without letting the other basics control you, and thus keep that 150 page manual where it belongs - in your camera bag.

Tip: if you want one accessory, bring a tripod. This one item can solve camera shake issues and help you get beautiful evening shots.

Tip #10: Be Bold

Kayak in Monterey Bay - Risky but Worth It
Kayak in Monterey Bay
Risky But Worth It

Monterey Bay - Otter Mom and Pup
Otter Mom and Pup
Awwwhhh...

Don't allow yourself to be paralyzed by fears of using the wrong settings, or an non-politically-correct social policy.

If you are afraid of upsetting someone by taking their picture, just go up and ask if it's okay. Ask them to sign a release and offer a print in return.

With wildlife, adopt a low-impact method when you go places where few photographers have gone before. For the above photos, I put my camera and telephoto in a waterproof bag and kayaked out into Monterey Bay. (Lawyer-talk: This can be dangerous - so be careful.)

Be wise... but be bold.

11 Tips for Beginner Photographers

1. Don’t go crazy buying the most expensive equipment right away.

It’s possible to get very nice photos with an inexpensive point and shoot. See these examples on Flickr. The more photos you take, the more you’ll know about what kind of camera to get when it’s time to upgrade.

2. Consider a tripod.

On the other hand, an inexpensive tripod is worth getting, especially if you have shaky hands like mine. When I got a tripod, my satisfaction with my shots skyrocketed. For even more stability, use your camera’s timer function with a tripod.

3. Keep your camera with you all the time.

Photo ops often come when you least expect it. If you can keep your equipment relatively simple – just a small camera bag and a tripod – you might be able to take advantage of some of those unexpected opportunities. Or, if your phone has a camera, use it to take “notes” on scenes you’d like to return to with your regular camera.

4. Make a list of shots you’d like to get.

For those times you can’t carry your camera around, keep a small notebook to jot down places you’d like to come back and photograph. Make sure to note any important details, like the lighting, so you can come back at the same time of day or when the weather’s right. If you don’t want to carry a notebook, send yourself an email using your cell phone with Jott.com.

5. Don’t overlook mundane subjects for photography.

You might not see anything interesting to photograph in your living room or your backyard, but try looking at familiar surroundings with fresh eyes. You might catch an interesting trick of the light or find some unexpected wildflowers in your yard. Often a simple subject makes the best shot.

6. Enjoy the learning process.

The best part of having a hobby like photography is never running out of things to learn. Inspiration is all around you. Look at everything with the eyes of a photographer and you’ll see opportunities you never noticed before.

7. Take advantage of free resources to learn.

Browse through Flickr or websites like the Digital Photography School Forum for inspiration and tips. Also, your local library probably has a wealth of books on all types of photography. If you’re interested in learning about post-processing, give free software like the GIMP a try.

8. Experiment with your camera’s settings.

Your point and shoot may be more flexible and powerful than you know. Read the manual for help deciphering all those little symbols. As you explore, try shooting your subjects with multiple settings to learn what effects you like. When you’re looking at your photos on a computer, you can check the EXIF data (usually in the file’s properties) to recall the settings you used.

9. Learn the basic rules.

The amount of information about photography online can be overwhelming. Start with a few articles on composition. Be open to what more experienced photographers have to say about technique. You have to know the rules before you can break them.

10. Take photos regularly.

Try to photograph something every day. If you can’t do that, make sure you take time to practice regularly, so you don’t forget what you’ve learned. An excellent way to motivate yourself is by doing the weekly assignments in the DPS Forum.

11. Don’t be afraid to experiment.

If you’re using a digital camera, the cost of errors is free. Go crazy – you might end up with something you like. You’ll certainly learn a lot in the process.

submitted by CSS from www.heretocreate.com

Friday, May 7, 2010

Clear Recently Used Files in MS Office

So, we all know about the recently used file list found on the File menu / Office Button in the MS Office Suite programs.

It's automatically there and I know that I personally use it a lot. But what if someone else is going to use the computer and you don't want them to see the list… for whatever reason you may have.

The question that begs to be answered is actually a two-part:

1) Can I turn off the list altogether?

2) Can I clear it and start over?

The answer to both is yes - so let's get right to business.

We'll start with completely turning the feature off.

Accomplishing this task is as easy as it is to change the number of files for the list to contain.

We need to get to the program's options.

Older Office programs will use the Tools menu, Options choice.

In the Options dialog box go to the General tab and uncheck the option for Recently Used File list.

image


Click OK.

In Office 2007 it's up to the Office Button we go and then to the Options button for that particular program.

Once in the Option dialog box you need to go to Advanced Options, Display section.

image


You'll notice that there is not an obvious way to turn the feature off. Instead, you need to set the number of documents to zero.

Click OK.

No more recent files listed for you!

Now, let's turn our attention to simply clearing the list.

Basically, you'll do exactly what you did to turn the feature off.

This clears the list.

Once cleared, go back in and turn the list back on, setting the number of desired files as you see fit.

Exit the Options dialog box and you're back in business but with a fresh start!

Excel Printing Tips – 6 Steps For Perfect Printing

Do you get tens of pages out, with some of the columns standing by themselves in an unknown page every time you print out an Excel worksheet? Tired of wasting paper time and time again?

It’s time to get things straight. Let’s see how to print an Excel sheet the right way.

[All the Excel tips shown here work in Excel 2003 as well]

Step 1 – A new sheet filled with data

I used Google tables to get some excel suitable data. Currently, it looks like this:

This is how our sheet looks like at the begining

This is how our sheet looks like at the beginning

Step 2 – Convert the data to a table

(If you do not use a tabular structure in your sheet, you can skip this step.) One Excel tip to make the data look better and easier to scrutinize with, start by converting it to a table. Select the cells that contain data and press Ctrl + L. in the opened window click OK .

Create Table

The sheet now looks like this:

Table-w570

The data designed as a table

Step 3 – Set the area to be printed

Another Excel tip to print only the part of the sheet you need is to set a print area. Select the cells (if it’s a table, click somewhere inside it and press Ctrl+Shift+8). On the ’Page Layout’ tab, in the ’Page Setup group’, click ’Print Area‘, and then click Set Print Area’.

Step 4 – Wrap the text in the cells to make it visible

In order to make all the text in the cells visible, leave the cells from the previous step selected. On the ‘Home’ tab, in the ‘Alignment’ group, click ‘Wrap Text‘. Doing so will make the lines spread down and the text within them visible. This is a useful Excel tip when you have long lines of text in individual cells.

Wraped Text

wrapped Text

Step 5 – customize the data to fit into the desired size and number of pages

Now is the critical part. In order for the printing to look well and make sense, you need to set it right in the print preview mode. Go there by pressing Ctrl+F2.

Click ‘Show Margins‘ in the Preview group. The page margins will be displayed. Stand on each of them with the mouse and drag them to the edges of the page, as much as your printer can handle (you can also choose one of the default margin values by going back to the normal view and in the ‘Page Layout’ tab, in the ‘Page Setup’ group, clicking ‘Margins’).

Broaden_page_margins-w570

Now, choose ‘Page Setup‘ in the Print group. In the opened window, fill-in the desired values under ‘Fit to‘. If you set it to 1 page wide by 1 page tall, as I did in this showcase, your data will be printed on a single page. The cost of doing so is that the text will become smaller (since all of it has to fit into a single page).

Page_Setup-w570

Step 6 – Center the table and add a header and a footer

Still in the ‘Page Setup’ window, click the ‘Margin’ tab. Under ‘Center on page‘, select the ‘Horizontally‘ and ‘Vertically‘ check box.

Center_Taable-w570

Now move to the ‘Header/Footer’ tab, click ‘Custom Header‘, and fill-in a header. You can include text, page number, images and so on. Click ‘Custom Footer‘ to add a footer. Click OK.

Footer_and_Header-w570

Step 7 – customize row and column sizes

As different cells contain different data or information, you might want to change the length or width of the rows and columns. You can do that in the print preview mode, by standing with the mouse exactly on the borders of the cells and dragging them right or left.

Since now some of the cells might be bigger in length then they need to be, lets make them automatically fit the text inside them. Press the ESC key to go back to normal view. Select the entire sheet by pressing Ctrl + A, and double click the separator between line three and four.
‎ double click the separator ‎
You may need to repeat step 6 several times until the table fits perfectly to the page.

The final display is present below. You are ready to print.

Ready_to_print-w570

How do you achieve perfect printing? Do you have any Excel tips of your own to share? Let us know in the comments.

by Eyal Sela on Aug. 7th, 2009

Quicker Data Entry in Excel

I don't know about you but I often find that when entering data into an Excel worksheet I'm frequently entering data at a rapid rate only to stop at the end of the column or row to move to the next.

For example, let's say that I have information about customers such as name, address and phone number set up in columns A, B and C. I might then want to enter the actual data into rows 2 through 15.

After the first row of data I have to stop to go back to column A on the next row.

Enter data, stop, next row, enter data, stop… you get the idea and it's a pretty frustrating situation.

I really don't want to be bothered with all the starts and stops. Just let me enter the data efficiently without all the delays!

Well, today I have just the thing we need to move along at a pretty speedy rate.

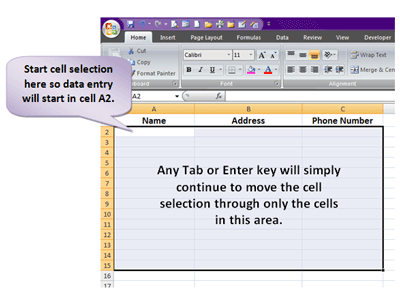
The whole key is to select all the cells for data entry before starting.

To explain let's return to the above example…

Before I begin entering customer information I would select a rectangular set of cells containing columns A through C and rows 2 through 15. (Start the selection with cell A2 in order to begin your data entry there.)


Now, with all the cells still selected, begin entering the data.

I found that I could use either the Enter key or the Tab key to move from one cell in the selection to the next. (Arrow keys remove the selection of the range so don't touch those!)

The cool part is that when the cell selection reaches the edge of the selected area it will automatically return to the top of the next column or the first cell of the next row (based on the direction you are moving).

I enter a name, Tab, address, Tab, phone number, Tab and POOF!

I'm at the start of the next row ready for the next customer name without the need to navigate over there.

Oh… and as an extra FYI… when you get to the last cell of the selected area the cell selection will cycle back around to the top again. That's a fact to keep in mind. You don't want to be on a "roll" forget where you are and cycle back to the top and then accidentally overwrite data.

And, there it is, a simple way to make data entry as smooth as silk.

Best Canvas Printing Tips

Canvas printing is an emerging trend that brings with itself numerous benefits. For optimum effects, follow the tips provided in this article.:

Printing photos on canvas is a very new process for the digital printing industry. It has only been around about 5 years. Despite being so new to the industry, it has had considerable growth. Printing your own photo on canvas is priced very low when comparing it to having a portrait painted on other materials.

Photographers everywhere have always questioned the longevity of their printed pictures. Some prints on paper can last over one hundred years. The longevity of a photo on canvas is determined by two important criteria. To make prints on canvas stand the test of time, the ink’s color-fastness will determine the prints resistance to fading.

The quality of ink will make your print on canvas last from a few years to well over a century. The other important criterion is the quality of the canvas. This should be made from acid free cotton, which helps with ink absorption and prevents yellowing. Also, hang the canvas in an acid-free frame so the print quality does not break down.

Tips to Remember

- In choosing a photo to transfer to canvas, you will have to keep some things in mind, especially the shape and orientation of the photograph. Most photos are rectangular shaped, which will be put on a square print after they are cropped.

- The main subject should be near the center of the photo. If it is off-center, it can be cropped to accommodate. If it is on one side and you prefer to have it in the center and not lose part of the subject in cropping, a border can be wrapped around the frame.

- The size will determine how much of the print will end up on the canvas. If you have a large print you can get more of the details due to the size of the wrap.

- If you are choosing a digital image to put on canvas this is made up of small dots that are called pixels. Each pixel will be made of one of countless colors. The resolution is the size of the picture and is measured in the number of million pixels called mega pixels, which the camera is able to record. Cameras with higher resolutions mean you can produce larger prints with your pictures, as you will have more pixels and won’t compromise the quality.

- Choose the photo canvas printer carefully, making sure they are experienced in canvas printing.

- The photo canvas should be coated with a finish that protects the canvas from scratching and cracking. This will have a satin finish to last longer but also come in matte and gloss finishes.

- Always check your photo for high resolution and the image quality shouldn’t be below 100 dpi. If it is below this, the photo canvas will be blurry. Ask the printer for a proofing option.

- Do not use a photo with low lighting or "red eyes". Some of these problems can be fixed with software for photo editing.

- The photo that you choose should be something that is timeless. It should be of an event you won’t want to forget so you do not get tired of it.

Plan out your canvas printing carefully and you will have a keepsake for your lifetime.
By Adam Ali

Cut and Copy Formulas in Ms Excel

So, we all know the difference between a cut/paste and a copy/paste, right?

I mean, it's pretty obvious. One actually moves the cell contents and the other makes duplicates.

But, did you know that there's a difference in the way each of them treats formulas with relative cell references?

(Note: Relative cell references are formula references to other cells based on their location as compared to the cell with the formula. In opposition, they would be absolute cell references, which refer to a specific cell, no matter where the formula is copied or moved).

No? I didn't either until I ran across this little gem while on a fact finding search for another tip idea.

Since there is a difference, it seems to me it would be a good idea to know exactly what Excel is doing with our formulas.

If you copy/paste a formula containing a relative cell reference, you will find that the cell references are adjusted. That is, the new formula will call for cells located in the same positions, as compared to the cell containing the formula.

For example, let's suppose you have the following situation where cell D1 contains a formula for the sum of cells A1 to A3

With a copy/paste, you will see that as the formula is copied one column to the right, the cell references are also changed to read one column to the right. (Instead of calling on cells A1 to A3, the new formula calls for cells B1 to B3).

The original formula called for data three columns to the left and so does the newly copied formula.

In contrast, if you choose to cut/paste the formula, you will find that the cell references are NOT changed.

The formula still refers to the exact same cells as it did in its old location. It truly is a simple move of the formula with no interference from Excel...

Who would have thought there are bigger differences between the copy and cut in MS Excel?

Here we thought it was all about how many formulas you would end up with!

Best Hair Styling Tips

If you want to style your hair the best possible way, here are some handy tips you can follow to have great looking hair. You are the envy of your friends and you can be assured of every head turning at you, in a crowd. So get yourself a few accessories before you can settle down to styling your hair. A good hairbrush is a must-have for hair styling while a comb with its handle like the rat tail is the most essential accessory. This is meant for parting your hair into neat partitions to make the braids.

If you have to tie your hair, do not go for rubber bands as they tend to tear off your hair. Instead you may use elastic, which do not pull at the hair and is much safer. Of course, you may use a scrunchie which many people feel are out of fashion. But these are very gentle on the hair and are safe to use. Too much heat is not good for your hair and so if you consider curling your hair, you could be doing some damage to your hair. Blow drying hair also causes a lot of damage. But if once for all you have to curl your hair, you could choose a good hair drier or a curling iron. Hair pins are good for the hair but claws have edges that are rough although they look nice. There are metal barrettes that are too hard on the hair.

Hair Styling Tips Men WomenHere are a few styling tips that you can try out, if you are not in a position to visit an expensive salon.
Do you know how you can create soft waves in your hair and startle others with your gorgeous looking hair style? All you have to do is blowing your hair using some bottled water and then let the hair dry up with time.

A quick wavy look is possible when you can part your hair and then loosely make a lot of braids around your face. After that you can blow dry them and then let the hair cool before you take the braids off. The result shows that hair looks wavy at the bottom and straight on top.

There is yet another way to have the wavy look where you can part your hair dividing them into one inch sections. You can roll up these sections and attach hair clips or pins to keep them in place. You have to shower your hair using a shower cap and then take the clips out to reveal your new wavy hair.

For getting newer hair styles be sure to invest in hot rollers, and the best blow drier with a nozzle and a diffuser for different style to curl your hair. You are out to make waves in social gatherings and soon become the talk of the town.

Releated Tips:

Hair Care Tips for long hair

Hair Care Tips

Print Preview While Editing in MS Excel

Sounds unbelievable - how in the world will we preview the printed version of a worksheet while we edit?

We're all very used to creating our worksheets then going to print preview. The process always seems to hold surprises. It doesn't split from one page to the next in any way we had anticipated… the header is so large that it overlaps the worksheet content… the list of disappointing surprises could go on for days.

So we go back and begin to rearrange and edit while we're grumbling the whole time about wasting time and wishing that we'd known how it all was going together as we were doing the work the first time.

The good news is that when they created Excel 2007 they created a Page Layout View - just like Word has - that gives us the ability to create and edit our data combined with all the power of Print Preview.

Want to take a look?

Of course - so let's get to it.

Obviously we're in Excel and while you can take a look with an empty worksheet it might mean a bit more if you've got a file open so you can really see what Excel is giving you.

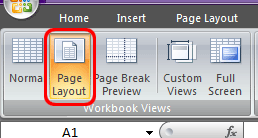
At any rate, we need the View tab of the Ribbon.


In the Workbook View section (far left) click the Page Layout View button.

Instantly you're looking at your worksheet broken into separate pages complete with margins, headers and footers.

With this view there's no more printing "surprises" making your work day just a bit easier.

Print4Less Tips

Getting the Best Results from your Printer

Whether you use Original, Remanufactured or Compatible cartridges in your printer, follow these guidelines to obtain the best printing results:

1) Use your printer regularly. Ink will dry out in an infrequently used print head, which will result in blockages and produce patchy printing

2) Keep your printer clean. Everyday dust, fluff and even cat hair in your printer can contribute to blocked print heads. Cover the printer when not in use.

3) Never remove an Epson or Canon inkjet cartridge until empty, even if you have a printing problem. Removing and replacing the same cartridge increases the risk of air getting in which will disrupt the ink flow and eventually dry it up. It can also makes the ink outlet hole bigger, increasing the risk of leaks. (NB. This does not apply to Hewlett Packard or Lexmark cartridges where the print head is part of the cartridge)

4) When your cartridge is empty, do not remove it until you have a replacement. Leaving a printer without a cartridge in it allows any ink in the print head to dry out, causing blockages.

5) Use your printer's utility programs regularly to clean and realign the print heads.

Note
A cartridge may not work when you first put it into the printer. This is because air has entered the print head when the old cartridge was removed.
To rectify this, run the 'clean print head' utility a number of times to flush the fresh ink through.

A printer's utility programs can be found in the printer's properties.
In Windows, Click Start > Settings > Printers.
Right Click on the required printer and select Properties.

Having problems?

Compatible cartridges
(e.g. Epson, Canon, Xerox)

Problem - Cartridge not printing / patchy printing

1. Ensure that the tear-off strip has been removed.

2. Clean the print heads (according to your printer manual) and perform a print test. If there is no improvement then go to step 3.

3. Perform 5 cycles of the clean print head procedure (without printing anything between cycles) and leave to stand overnight. DO NOT perform any print tests until the following day.

Problem - Cartridge not recognised

1. Check that there is a computer chip attached to the front of the cartridge

2. Ensure that the cartridge is seated correctly in the cartridge holder

3. Delete any items in the printer queue, turn off your printer, re-boot your computer, the turn the printer on again

4. Remove the cartridge and wipe the chip with lightly moistened tissue paper. Allow to dry and re-insert cartridge into printer.

5. Your printer may recognise that the cartridge you are using is not their own brand and might ask you if you wish to continue. Always click 'Yes'. Clicking 'No' may alter your printer's software settings.
(NB. Printing problems caused by the user adjusting their printer's settings are not covered by the guarantee as the problem was not caused by the inkjet cartridge)

Remanufactured cartridges
(e.g. Hewlett Packard, Lexmark, Samsung)

Problem - Cartridge not printing / patchy printing

1. Remove cartridge from printer, cover the print head with a kitchen towel and shake firmly.

2. Place the cartridge print head down on a moistened pad of kitchen paper. Leave to stand for 5 minutes and then dab the cartridge lightly on the wet towel until the ink(s) show on the paper.

3. Re-insert the cartridge into the printer and perform a print head cleaning cycle as per your printer manual.

Problem - Cartridge not recognised

1. Remove cartridge from printer wipe the chip and print heads with lightly moistened tissue paper. Allow to dry and re-insert cartridge into printer.

Hair Care Tips for long hair

Long hair looks extremely elegant but there is quite a lot of care that goes with the maintenance of long hair. Hair that grows fast tends to become long in no time. Little girls often grow long hair which their mothers pleat into neat braids. They really look the best at any party. Long hair is the asset for any woman and nothing could be the best adornment for her. Long hair needs a lot of care.

Hair Care Tips for long hair The long hair should be carefully oiled, massaged and shampooed for best look. Unkempt long hair would only speak for the untidiness of the person with the long hair. This should be done regularly so that the hair maintains it shine and gloss. Long hair should be protected against all sorts of hair infections like dandruff, acne and head lice. These would make the scalp itchy and the hair very dirty. Care is essential to keep these infections away. Long hair would indulge in a lot of hair styles. Care should be taken so that use of clips and bands do not tear away tufts of the beautiful long hair. Neat French braids or plaited braids would look extremely elegant in case of long hair and this should be done so that the long hair is kept neatly in place. Keeping clean long healthy hair is important.

She should be extremely careful in her ways and means of caring for the long hair. Proper intake of food and vitamin rich food is essential for keeping hair long and healthy. The brushing and combing of hair is utterly important and once the hair is taken care of, it would start responding to the whole process. If you have long hair, try to live up to maintaining and caring for it. There should be a balance in all you do about your long, hair, the care you take and the hair style you follow in making people look back at you because of your extremely wonderful cascade of long hair.

Releated Tips:

Best Hair Styling Tips

Hair Care Tips

Find and Replace Multiple on Worksheets Simultaneously

Okay, so you've used the Find/Replace function in MS Excel with a lot of success before, right?

But, let's just say you now have a multiple worksheet file and you have to search for replacements on several (or all) of the worksheets. What do you do?

You could run the Find/Replace on the first worksheet, switch to the next sheet and start the process again. Granted, Excel doesn't require you to re-enter the data again, but you still have to work with all the buttons to repeat your work (not to mention all the time you spent switching between worksheets).

Looking for a way to complete the Find/Replace on several different worksheets with one quick move? Well, here's a little trick to help you wrap up this repetitive work in a jiffy!

The next time you're in this situation, begin by selecting not just one worksheet, but all the worksheets that need to be searched.

-
Use either the Ctrl key or the Shift key in conjunction with the Sheet Tabs to select all the worksheets Excel should search.

- Then start the Find/Replace feature (Ctrl + F - or - Edit menu / Find choice - or - Home tab of the Ribbon / Find & Select button).

Once the feature is open with all the sheets selected, the program will consider all the data on the selected sheets when it's searching and replacing.

Voila. Many steps condensed to one!

Go To Special in Excel

Have you ever looked at an MS Excel worksheet and wondered how long it was going to take you to select only those cells that contain text or formulas or numbers or those cells that have errors?

Plus, while you're wondering that, you're just dreading the old Ctrl key + click, click and click some more on all cells that meet the criteria.

Maybe you're trying to protect the text of the file and need all those cells selected or maybe you're looking to format all the numbers differently. Whatever your situation, you need to select only the cells containing a specific type of information and you need a quick way to select them all at once.

Seems like a perfectly reasonable request to me, so let's take a look at a way to get the job done efficiently!

You obviously need to have the file open and be on the worksheet with which you're looking to search. Have only one cell selected as well. If you have several highlighted, it will only search through the highlighted cells and not the whole worksheet.

Now, open the Go To feature (Edit menu / Go To choice -or- Home tab of the Ribbon / Find & Select button / Go To choice -or- Ctrl + G or the F5 key).

When the Go To dialog box opens, you're looking for the Special button.

image

When the Go To Special dialog box opens, you're looking to select Constants. (If you're only trying to find formulas, select that choice and follow the same steps as below).

image

When you select "Constants," you'll notice that the choices just below the Formulas choice become active.

You need to leave only the type of data you're looking to highlight still checked.

So, if you're looking to highlight only text, unselect everything, but the text option.

When you've made your selection, click the OK button.

Poof!

You're returned to the worksheet with all the cells highlighted that contain your requested data type.

Here's a bonus for my Excel 2007 users: You can go directly to the Go To Special dialog box from the Home tab via the Find & Select button... just choose Go To Special from the list instead of Go To.

image

So, say bye bye to the old Ctrl + click, click, click.

You gotta love the efficiency!

Draft Quality in Excel

Find yourself printing an Excel worksheet just for editing purposes? Let's face it, not everyone does their best editing on the screen… some people just need to have it on paper with pen in hand to do quality editing work.

However, if you're like me then it begins to feel like a waste of resources.

Ink and toner aren't cheap so printing high quality stuff just to take a pen to it for editing seems like such a waste.

While I can't do anything about the paper part of the printing, I can do something about the amount of ink or toner I use to print the drafts meant for editing.

So let's take a look at setting Excel to print drafts as drafts and let's save a few cents here and there.

The first place we need to go is to the Page Setup dialog box.

In Excel 2007 go to the Page Layout tab of the Ribbon and click the dialog launcher located in the bottom right corner of the Page Setup section.

Older versions of Excel require you to go to the File menu, Page Setup choice.


image

Once there we all need to go to the Sheet tab.

image

In the Print section check Draft quality and click OK.

Now when you print the worksheet you'll get everything you need, the printing won't be as fine-tuned as a finished product, but it will serve your purposes.

Design Tips for Commercial Printing

What types of images will work ok?

If you are scanning the images yourself from photographs it is better to save them in either tif, or eps format. These image formats will preserve the color and sharpness of your pictures the best. File formats like gif or jpg compress the pictures color and pixel resolution and this can cause color shifts and blurriness. Since jpg and gif are the most predominant image formats on the web, it follows that it's not a good idea to simply lift an image from someone's website and use it in your layout. low resolution image You should scan your images using a resolution of 300dpi at the final dimensions you intend to use them so that your colors will look smooth, and hard objects will look sharp. In other words don't scan at 300dpi and then enlarge the picture by 200% in your layout program! This is another reason why you should not use images that are lifted from websites; they are probably only 72dpi in resolution and will look very blurry if printed on a printing press. See our Resolution page for more information on resolution. If you are using pictures from your digital camera they will work just fine if they are jpgs; the quality of jpg images from digital cameras seems to be much better than jpgs that are used on the web. You must do the math to make sure that it is high enough in pixel resolution though. For instance, if your camera puts out a typical image of 1280 x 960 pixels at 72dpi you get about 17" x 13" of photograph (at 72dpi); this is the same amount of detail as an image which is 4" x 3" at 300dpi so it's safe to reduce or enlarge that image in Publisher up to about 4" x 3" in dimension.

Do I need to send you my fonts?

If you use only the fonts that came with MS Publisher then no. We have them here too. But if you use any other fonts from other sources then we do need you to gather up copies of them and archive them together using a program like Winzip and send them to us with your layout file. If you don't know how to do this then just carefully go through your document and make a list of the fonts used. Send that list to us in an email along with your order reference number so that we can find good substitutes for your typefaces.

Will my printed piece look exactly like it does on my computer monitor?

There are some small differences. Scanners and digital cameras create images using combinations of just three colors: Red, Green and Blue (called "RGB"). These are the colors that computers use to display images on your screen. But printing presses print full color pictures using a different set of colors: Cyan (blue), Magenta (red), Yellow and Black (called "CMYK"). So at some stage your RGB file must be translated to CMYK in order to print it on a printing press. This is easily done using an image editing program like PhotoShop or Corel PhotoPaint. Caution: It's Best If You do the RGB-to-CMYK Conversion of Your Images! You will have more control over the appearance of your printed piece if you convert all of the images from RGB to CMYK before sending them to us. When we receive RGB images, we do a standard-value conversion to CMYK, which may not be perfectly to your liking. We want you to be happy, so please, take the time to prepare your file properly. We cannot be responsible for sub-par results if you furnish low-res images or RGB images. Be aware that it is possible to make colors in RGB that you can't make with CMYK. They are said to be "out of the CMYK color gamut". What happens is that the translator just gets as close as possible to the appearance of the original and that's as good as it can be. It's something that everyone in the industry puts up with. So it's best to select any colors you use for fonts or other design elements in your layout using CMYK definitions instead of RGB. Please see our RGB - CMYK Information page for important instructions on getting the results you want.
rgb colors
RGB colors
(what you see on screen)
cmyk colors
CMYK colors
(printing inks will do this)
rgb  colors
RGB colors
(what you see on screen)
cmyk  colors
CMYK colors
(printing inks will do this)
You most likely won't notice this kind of color shift in a color photograph. It is more likely to happen if you pick a very rich, vibrant color for a background or some other element of your layout. It probably won't look bad, it just won't look exactly the same. But it may not be noticeable at all either. In any event it will look spectacular compared to a piece printed on an inkjet printer.

Color photos don't suffer much from CMYK translation
rgb image
RGB picture
(what you see on screen)
cmyk  image
CMYK picture
(printing inks will do this)

Can I use colored text?

It’s best not to colorize small text. What happens is that all printing presses have a little bit of variance in the consistency of the position of the different color plates. This is called misregistration. The cyan, magenta, yellow and black portions of the text characters don't line up exactly. So the result is little colored halos around the characters. It's ok to use colored text on large, headline type, or smaller sizes down to about 12 point size, but much smaller than that will be too noticeable and you won't like it. The same thing holds true for white (knock-out) text on a dark or colored background. You can do it but don't use point sizes smaller than about 12 point. Otherwise the words may be hard to read and it will look unprofessional.
mis-registered text
Small text magnified

Small  text magnified
Small text magnified

Can I put text over an image?

Be careful about using photographs for backgrounds. If you put text (any color) on top it can be very hard to read. So the secret is to lighten the photograph a lot--more than you may think is necessary. Use a photo editing program like Paint Shop Pro or Adobe PhotoDeluxe.

text over dark backgound text over light background


bleeds

What are bleeds, and do I need them?

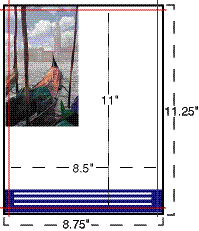
Bleed is the term for printing that goes right to the edge of the paper. The way to do this is to make your document .25" too big in both dimensions. For instance, if the final size is 8.5" x 11" then make your document 8.75" x 11.25". Draw guides on the layout that are .125" from the edge all the way around. Now create your design with the idea that the layout will be cut off where those guides are....because that is precisely what is going to happen. Make sure that any photographs or backgrounds that you want to bleed go clear out to the perimeter of the document, past the guidelines. Then after we have printed your piece we will trim off that extra .125" all the way around and voila! You have color all the way to the edges of your piece. It looks professional....

Money & Travel

What credit cards do I need to take with me?
Take your major credit cards, such as, Visa, Master Card and American Express.

Make sure they are really credit cards and not just debit cards with a credit card company’s logo on them. Many locations require a credit card and will not accept a debit card, so they may have limited use on your travel.

Leave all your local store credit cards in a secure location at home; there will be no need to carry them with you.

Why should I contact my credit card companies before I leave?

You want to notify them of your trip. They may delay you if they are unaware you are traveling. The unfamiliar spending patterns might cause them to suspect that the card is being used fraudulently and delay your approvals.

They will be able to explain many of the services that they can provide while you are on your trip.

How can my credit card company help prepare me for my trip?

You can arrange to pay bills that will come due while you are gone.

They will be aware that you will be making charges from another country.

They will be able to give you an idea of how acceptable their credit card is in that particular country.

They can verify acceptance at certain foreign locations.

They’ll be able to see if your PIN number will work in the countries you are visiting. They can also issue you another PIN number if your current PIN is unacceptable to the foreign bank’s system.

They can explain cash advance, ATM, foreign purchase and foreign exchange rate policies and fees.

They can explain any services they offer, such as, extra insurance for your rental car, luggage or purchases. Make sure the coverage offered extends outside the United States and will be valid in all the countries where you’ll be traveling. Also, be sure to note any other exceptions.

They may need to give you another phone number to call in case you need to reach them. The 800 number listed on the back of your card may not work from foreign locations.

You can find out if they charge a currency conversion fee, so you can find the most economical card on which to place your foreign purchases.

Should I use my ATM card while traveling?

Yes, you’ll have access to cash during your trip so you won’t have to take as much cash with you and using your ATM card can also be a good way to get cash in foreign countries.

The ATM will issue money in local currency.

You should exchange at the bank’s wholesale exchange rate. You may still want to shop around to different banks since some will charge a high usage fee for their ATMs. Although, even high ATM fees may be less than others will charge for currency exchanges.

Don't wait until you're out of money to go to an ATM, the machines can run out of money or break down.

What should I know about using travelers checks?

If the particular brand of travelers checks are accepted in the country you’ll be visiting.

How widely they are accepted within the countries you’ll be visiting.

Any fees for purchasing and using the travelers checks.

The travelers check company’s loss, replacement and refund policies.

How can I protect my travelers checks while traveling?

Take the same precautions you would to protect your cash. Be sure to learn and follow the procedures required if you lose your travelers checks. You’ll also need to make copies of your travelers checks before you go and keep separate from them the following information.

The serial numbers of the travelers checks.

The denomination of the travelers checks.

The date and location of their purchase.

The phone number to call to report them missing.

Photo Printing Tips

Learn how to touch-up your photos once they have been taken so they look perfect for printing.

Epson ArtisanDigital photography has paved the way for more magical moments than our brains can ever remember. Still, there’s just no virtual substitute for smudging up a glossy photo in your sweaty little hand. Assuming you’ve managed to take a few pics that don’t include your thumb, a few might even prove special enough to put in an album or on the mantle. Now all you have to do is choose the perfect printing process. Whether you choose to print photos at home, at a store kiosk, or ship them off to a printing service, here a few tweaks that can ensure the best images possible.

Choosing the Perfect Printer

Sadly, not all printers are created equal. If you don’t have the right equipment, no paper, programs or other tweaks will make your pics Photomat-worthy. Make sure you search web and check our expert reviews before purchasing new equipment. That said, printers like the Epson Artisan 800 ($299.99) and Canon Selphy CP510 ($99.99) make good fits for the everyday shutterbug, cutting out the need for a computer entirely. The Artisan uses an LCD for control, while the Selphy hooks directly to your camera. Similarly, the Polaroid PoGo Instant Mobile Printer ($99.99) is optimized to print cell phone pics—definitely an acquired skill.

Paper and Ink

Shocker: Most printer manufacturers suggest you use their own photo paper. While this isn’t a bad tip, it’s often not the most economical of solutions. Still, you shouldn’t skimp on quality in this regard.

That said, you don’t always have to spring for thick or shiny paper. In fact, if you plan on passing your photos around the holiday dinner table, matte paper might be a better choice. But if you want to go glossy, cheap paper will probably result in cheap quality images.

No matter what type of paper you ultimately settle upon, make sure you have enough ink to support printing photos. Printing on “best quality” settings, which will result in the best possible print, can really drain your tanks. Make sure you have an extra cartridge or two on hand if you plan to produce a lot of prints at home.

Resolution

Resolution is a measurement of the sharpness of an image. While always shooting for the most mammoth resolution might seem like a good idea, it’s actually wiser to keep images in the 300-dpi range. That means if an image is 4×6, it should be 300dpi. If it’s 5×7, it should still be 300dpi, and so on. Don’t try to increase a small, low-resolution photo by any great order of magnitude either. The bigger you bump it up, the blurrier it will become.

Size Matters

Don’t think that just because what you see on-screen looks great that it will transfer well to paper. While compressing photos might allow you to upload images at amazing speeds, those same snapshots won’t print well. When printing compressed photos at full size, each one could actually come out the size of your thumb. And the larger you make them, the more blurry and washed out each one will get.

Bearing this in mind, try to work with a 1024×768 high-resolution (e.g. BMP or TIF vs. JPG or GIF) image or larger when possible. Also, your photo’s image size ratio must match the print size ratio, or your subjects could lose their heads or other important details. “My point and shoot camera creates a 5-megapixel image that is 1920×2560 pixels. Divide this and you get a ratio of .75 or three quarters,” says Peter Wayne, a freelance photographer in Boulder, Colorado. “If you print on the standard size of 4×6 inches, this is a ratio of .6666 or two-thirds. This is not an exact fit, so a portion of the photo will be cropped off.” Wayne suggests cropping the picture manually using your favorite editing software, e.g. IrfanView or freeware alternative GIMP. “By doing this, you have control over what appears in the picture.”

Speaking of size, it might be a good idea to think about how big photos will physically wind up being when printed while actually taking pictures. Debbie Johnson, lead editor at Fodeo, says that close-ups are better suited to smaller 4×6 or 5×7 prints, while group shots may work better in a bigger 8×10 image.

Fodeo Screenshot
Fodeo Screenshot

Image Editing and Adjustment

You may not be able to wipe that topless guy out of your family beach photos, but there are plenty of other ways to clean up your photos. Try experimenting with photo editing software, i.e. free programs like Picasa 3 and Paint.NET. If you’re willing to invest a few dollars, Adobe’s Photoshop Elements ($139.99) and Corel’s Paint Shop Pro ($99.99) each provide pro-level features without the professional price as well. Speaking of keeping things neat and tidy, routinely clean the heads on your printer too to keeps photos looking as sharp as crisp as possible.

If you don’t have the proper equipment or time to burn learning photo editing software, it might pay to have someone else handle the printing part. You can always upload photos to an online retailer’s site (think CVS or Wal-Mart), and pick up pics at your local brick-and-mortar store. Services such as Shutterfly and Picasa also offer on-site image editing tools to crop, add color effects and help remove red-eye.

To minimize poorly printed pictures, it’s also important to make sure you initially shoot photos using decent lighting or at least the proper settings for action, nighttime or other scenarios.

Corel  Paint Screenshot
Corel Paint Screenshot

Organization and Archival

Of course, given the many images that are bound to eventually find their way into your collection, all those files and prints can get out of control as well. Therefore it pays to make sure your camera has the correct date settings, which become part of every digital photo file. It doesn’t hurt to add those dates to the back of each physical print either. It’s another important detail about the event, and makes it that much easier to organize all of those bright, shiny new snapshots filling up your family album.

Tips Of All Sorts